

Decoupage Stamps onto a Container
You Stamps will show how to make a fun storage container using an old tin or container, used postage stamps, and decoupage.
This is a fabulous craft to reuse and repurpose both old postage stamps and grits or other similar containers. If you don’t have used postage stamps, look below for links to purchase stamps and other supplies for this project. (We supply Replica GB Machin Stamps Brand New Self Adhesive for Decoupage and Crafting use ) Please check the link below:
WHAT YOU NEED FOR THIS PROJECT:
- Empty Metal Tin or similar container with a lid
- Used Postage Stamps removed from envelopes (Replica GB Machin Stamps on Self Adhesive Sheets click here: )
- Mod Podge
- Foam Brush
- Paper Bowl
- Newspaper

INSTRUCTIONS
For this project, a tin or container works nicely but you can use any other container with a lid. Find a container with a lid the size you need and mod podge it!
Before you start, decide if you will have a theme for your container and pick stamps that relate to that theme. For example, select all flower stamps to have a flower-themed container. Some other theme ideas are Machin Queen’s Portrait Red 1st class, Clue 2nd Class, Large 1st class, Large 2nd Class, and 1st class Large signed for (we supply brand new replicas on self-adhesive sheets to save you time looking for stamps to start your project), the 1800s, flags, Christmas (we supply off paper unfranked Christmas 1st and 2nd class for your project), birds, love, presidents, famous people, foreign stamps. There are so many options. Please check our off paper stamp section.
A random-themed container is also very nice. Pick out stamps that you enjoy and use them on your container.
Before you begin, decide to put the stamps randomly or in rows.
STEP 1: APPLY MOD PODGE
Place newspaper or any other protection cover on your table surface to protect it. Pour some mod podge into a bowl.
With the foam brush, apply mod podge to a small section on the grits container as shown below:
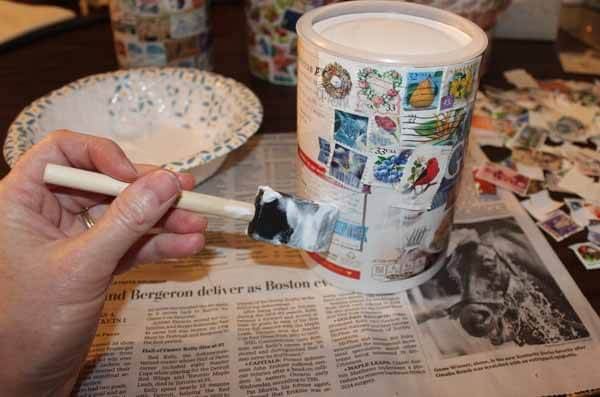
Important: As you progress, remove the lid so that it does not get glued by the mod podge.
STEP 2: APPLY STAMPS
Select a stamp and place it on the mod podge to affix it to the container. Keep applying stamps to the area with the mod podge. Overlap the stamps slightly so that no part of the container will show through. ‘Tip. If you are using our self-adhesive stamps, make sure the corners of the stamps are glued down and the security tabs ‘2 oval tabs’ are present when you remove the stamp from the sheet.’

Once you have the section covered, continue by applying mod podge over the last stamps placed and then onto the next section of the container. Apply more stamps. Continue until the whole container is covered. Remember to overlap the stamps slightly so that the whole container underneath is covered.
Add your stamps to the container in rows or randomly.
STEP 3: COVER WITH MOD PODGE
Once you have covered the entire container with stamps, apply one last layer of mod podge over the entire surface. Ensure that all of the corners of the stamps are glued down smoothly, and all stamps have mod podge covering them.
Apply the mod podge in an even layer and make sure there are no gloopy or globs of mod podge. Let the project dry for a minimum of 6 hours.

Below are some examples of the containers we made to give you inspiration.


We hope you enjoyed this project. This project can be a great rainy day or school holiday project. Save up some stamps or purchase them. Find some links below to purchase stamps, replicas, and off paper.


Leave a Reply